Applies to: Brands and Agencies
Spotify Ad Analytics has multiple verification tools to ensure your website pixel is properly installed and passing back data. These tools help you determine if data is being collected from your pixels. To verify that it is the correct data, use the following three methods to confirm pixel activity.
NOTE: The pixel verification tools display all website activity – not just attributed activity.
Event Log
- Navigate to Manage > Your Pixels and click on your alpha-numeric pixel ID.
- View the Event Log graph to see website traffic and ensure your pixel is installed. Hover over the graph to compare activity to your internal data. Example: if your website typically receives 10,000 visits per day, but your graph shows 5,000 per day, then the pixel may not have been installed site-wide. In this case, you should re-confirm your pixel installation.
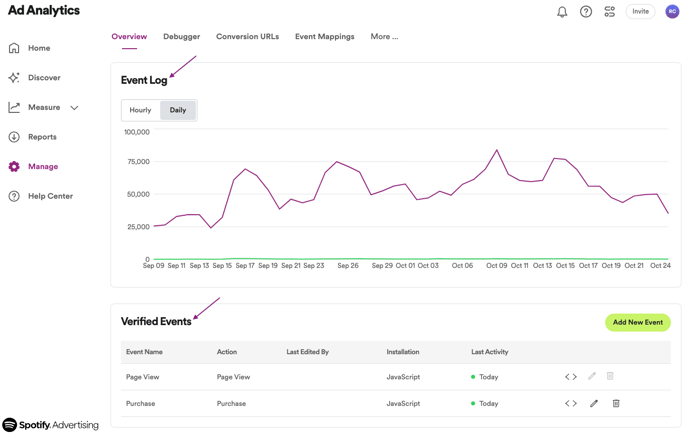
Note: If the Event Log displays unusually low fires in comparison to your website traffic, your site Content Security Policy may be blocking the pixel. Review our CSP guide here.
Verified Events
Use the Verified Events table to determine which pixels were created and whether or not they are installed.
- Below the Event Log, you will see your Verified Events table.
- Event Name: The pixel event name. Ensure the names are descriptive for advanced reporting purposes.
- Event Action: Page View is a required event used to display visitors and attribute them to your campaigns. Lead and Purchase events are optional events that can be seen in the Conversions section of your campaigns.
- Installation: Use the Installation column to see if the pixel is installed. If it is not installed, you will see a green Install button.
- Last Activity: Displays the date when the pixel last fired.
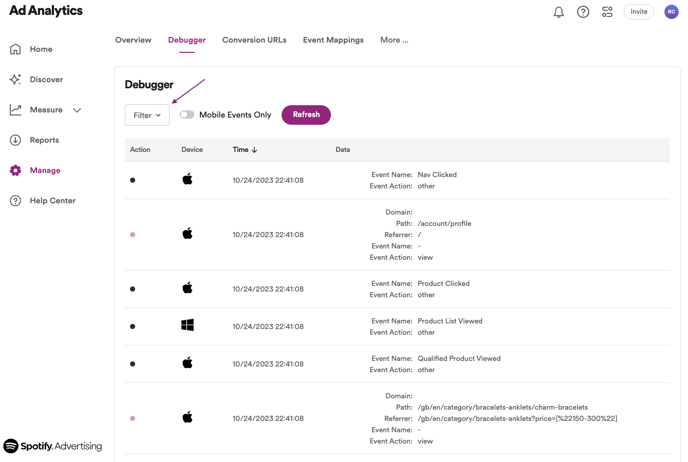
Debugger
Use the Debugger to verify which exact webpages your pixels are firing on, which data is being passed back to Ad Analytics, and view the values of orders placed (purchase pixel only). The Debugger allows you to confirm that the data you're passing back is what you wish to see in reporting and is best used as a pre-launch verification tool.
- Navigate to Manage > Your Pixels and click on your alpha-numeric pixel ID. From there, select Debugger.
- Scroll through the debugger events to view granular, raw data for each pixel you have installed.
- Filter the debugger to show specific events (ex: purchases, leads, etc.). Additionally, you can filter to show mobile-only events if you have them setup with Ad Analytics. See more on mobile events below.
Use the Debugger and Event Mappings for Mobile Integrations
If you are utilizing one of our supported Mobile Integrations and are tracking mobile events for your campaign, you may need to map your mobile event action if the name of the action event being sent to Ad Analytics does not match any of the Ad Analytics standard actions as listed: Purchase, Add To Cart, Product, Install, Checkout. You may add event mappings to mobile events.
- To add event mappings for your mobile events, navigate to Manage > Your Pixels and click your alpha-numeric pixel ID. From there, click Event Mappings tab.
- Click on the Add Mapping button located in the top right corner of the page. Enter in the exact event name pulled from your mobile partner and then select the event action that should be mapped to your event name.
- When you're done, click Save Event Mapping.
- Once you've saved your mappings, they will begin to populate into the debugger after attribution has run overnight so that the raw pixel data can be parsed, curated and mapped with the settings that you have just saved.
NOTE: Formatting for the mobile events feature is sensitive. Please be sure to check that the event name formatting in Spotify Ad Analytics matches your formatting for the event name in your mobile integration partner.
The Debugger will only show up to 100 of your most recent events at a time, so this will apply to the event mappings that fit this criteria.