Spotify Ad Analytics offers tools within the dashboard to allow for ease of reviewing your pixel placement. Because each brand utilizes dta specific to the measurement of there own KPIs, there is not a universal blanket approach to verifying and validating appropriate pixel placement. As such, we recommend using the in-dashboard tools in conjunction with your own internal tools while reviewing your Spotify pixel placement. However, we know that advertisers may have multiple KPIs being tracked for each campaign. We have therefore drafted verification practices that one should follow on the Ad Analytics platform based on most common KPIs.
The two main tools we recommend for use when verifying your JS pixel serve different purposes:
- Event Log - Provides a high level overview of the number of raw (unattributed) pixel fires of each event type that is being passed to Spotify Ad Analytics from the pixel. This graph will display one or multiple lines, dependent upon the number of events that have been placed.
- Debugger - Provides more granular details of the last 100 raw (unattributed) pixel fires in total, or the last 100 raw (unattributed) event-specific pixel fires. This does not contain PII, and is limited to data called to within the pixel event itself.
KPI: Brand Awareness
To ensure this pixel is set up properly, you’ll want to review two main portions within the Ad Analytics dashboard:
1. Event log- Once your pixel is installed and firing, your pixel event log will display a graph with both hourly and daily raw pixel fires.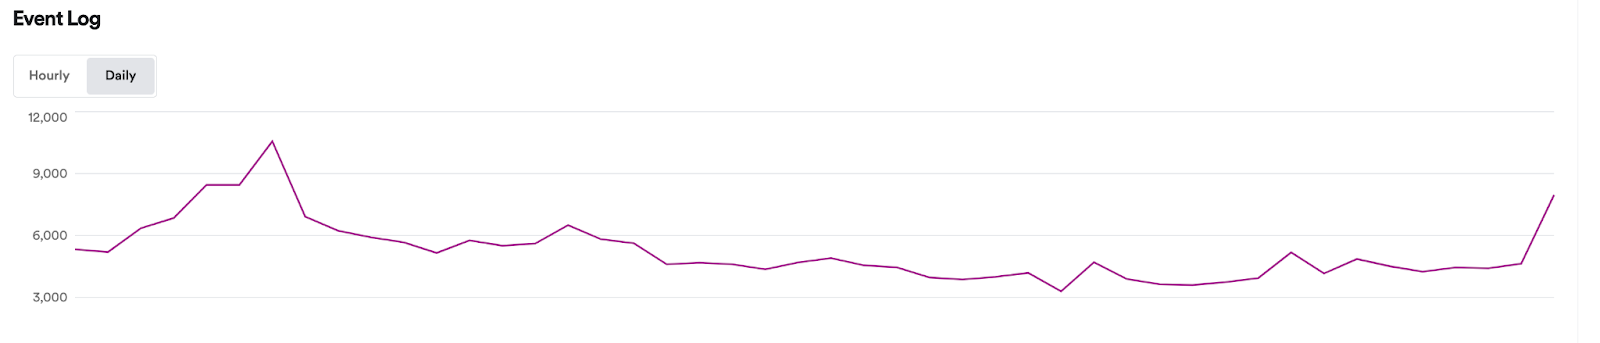
We recommend viewing this graph in a way that allows you to match one day’s sum of page view pixel fires to the sum of website traffic you are seeing within your internal systems. While the sum of any given day’s worth of data in Spotify Ad Analytics will often not match your own internal systems one-for-one, the numbers should be within the same ballpark. If your total website traffic is higher than what is visualized in the Ad Analytics dashboard, this means the pixel has not been placed site-wide, or has been placed site wide but is not firing as expected.
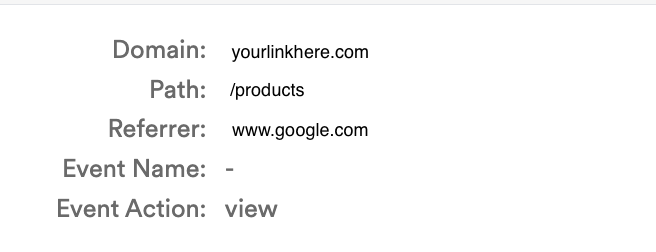
2. Debugger - The pixel debugger will display the last 100 raw pixel events. We recommend filtering only for the type of event you are looking for–in this case, page views. A healthy page view pixel fire will display information that includes the domain (yourlinkhere.com), the path (/products), referrer (google.com), and event action.This would like something like:
If the “domain” that populates is a domain other than that the advertiser’s intended domain, then the pixel should be reconfigured and replaced.
Additional signs of an unhealthy or incomplete page view pixel fire may look similar to this:
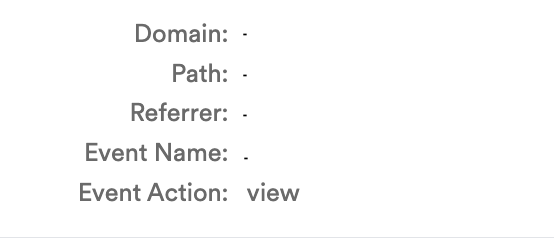
You’ll notice in the pixel fire above, we are not receiving the domain, path, or referrer information–all crucial datapoints for successful attribution measurement of a brand awareness campaign.
JS Pixel Placement Best Practices: Brand Awareness KPI
KPI: Sign Up/Interest (LEAD)
When reviewing and confirming the placement of your lead events with Ad Analytics, you will want to use the same tools used for the page view event: Event Log and Debugger
1) Event Log - Your event log will display one colored line within the graph for each event type that is sending us data. If you have created a single lead event, you’ll see the purple “page view” line and additional line for the LEAD event. If you’ve added multiple lead events, you will see one line for each lead event that is sending us data.To ensure we are capturing all intended lead events, we recommend you generate at least a few of each lead type, then check the event log for this traffic (note: the event log does not update in real time)
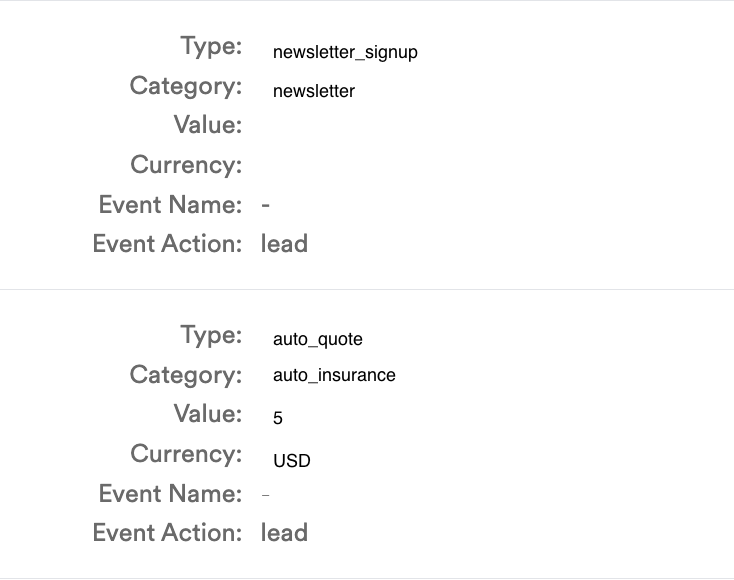
2) Debugger - Filter your debugger to LEAD, then allow the debugger to populate with the last 100 LEAD pixel fires. If you’ve created multiple lead events, you’ll want to search for each lead type (based on lead_type and/or lead_category) within the debugger. You’ll see in the screenshot below, one event, the newsletter signup, does not generate a value (or revenue) when it fires. However, the auto insurance quote generates a value of $5 USD when it fires. If this event is attributed back to a campaign exposure, it will count for $5 attributed revenue, even if they do not complete a final purchase.
JS Pixel Placement Best Practices: LEAD KPI
KPI: Purchase
To confirm the placement and successful fire of your purchase event, you may want to compare the Ad Analytics tooling to your internal systems. However, Ad Analytics tooling will provide significant details on a JS pixel implementation directly within the dashboard.
- Event Log - Your event log, which will show at least one line for raw page view pixel fires, will display an additional line for all purchases. This is a great way to look at the total number of raw purchase event fires for any given day, or any given hour within a day. On sites with high purchase traffic, you may see this graph populate within a couple of hours of implementing the purchase event. If you have lower purchase traffic, it could take longer before this graph populates. In either case, if after 12-24 hours you do not see the PURCHASE line populate, please review your event placement to ensure that there is nothing missing, or anything (such as CSP) blocking the purchase event from firing.
- Debugger - This piece works similarly in your pixel verification process as it does with other events. The debugger is meant to provide you with more granular information to ensure that the necessary data is being collected and made visible to Spotify Ad Analytics.
While all variables are not required, the more variables that are surfaced, the more data points you will have to be able to pivot your data during and post campaign. A strong purchase event will provide all details to us, as follows:
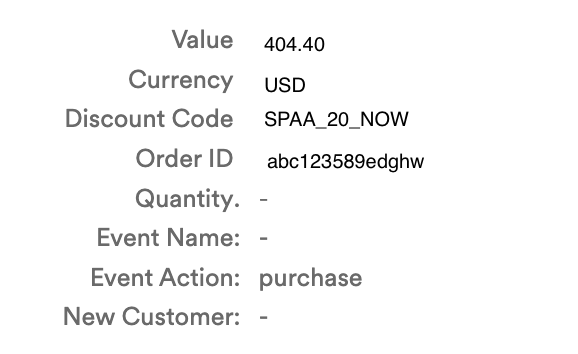
You’ll see in the image that we are receiving purchase-specific details including the value, currency, discount code, and order ID. All of these variables will surface in the conversion export for attributed conversions, allowing for you to play with the data as needed.
Alternatively, any debugger purchase that displays no information will only count as a purchase, without the ability to match the purchase back internally (using the order ID), review promo code usage (with the discount code), or generate revenue and revenue backed data (such as CAC and ROAS).
JS Pixel Placement Best Practices: Purchase KPI
You might also like:
General Spotify Pixel Best Practices
Spotify Pixel FAQs